
Tags
CGD, encryption, freedom, freesoftware, NetBSD, noAI, operating systems, sysadmin, technology, unix
In this post I will cover the installation process of the NetBSD operating system, including disk level encryption. Instead of using the standard installation program (sysinst), I decided to install NetBSD “from scratch”, as a way to dive into the internals, and learn more about the nuts and bolts of this great operating system.
This post is by no means a replacement for the NetBSD official guide. Sysinst is the the facto installer for NetBSD and is the most documented, straightforward way to install the operating system. This post is about having fun and understanding and learning the internals of the operating system. It also offers the highest flexibility to customize and overcome issues that may arise during a conventional installation.
I will try to establish a chronological order in the process, documenting the most relevant steps with screenshots and references to sources related to the topic.
MBR installation: NetBSD is notorious for its portability and being able to work in “old” computers. I decided to do the installation in a HP Pavillion (around year 2012) that uses MBR instead of the GPT partitioning found in more modern UEFI systems. (quick digression: Many of the so called “obsolete” or “old” computers are still useful and perform very well. You just need a good operating system ;). By adopting them, you will giving refurbished computers a great second life, you will be saving a lot of money and, most importantly, you will be preserving the environment from polluting waste.).
Let’s start 🙂
The installation image
The first step to install NetBSD is to download and copy the image to the USB pen drive.
Note: <usb_device> is the assigned device of your USB drive . Use the entire disk (ej sdb) instead of a partition. Please also note that this operation will wipe out your entire flash drive. Triple check that you are actually using the right device and not another disk of your computer.
Note: I will use the # as the shell prompt to denote root operations while the $ is for regular users.
$ wget https://cdn.netbsd.org/pub/NetBSD/NetBSD-11.0/images/NetBSD-11.0-amd64-install.img.gz$ gunzip NetBSD-11.0-amd64-install.img.gz$ sudo dd if=NetBSD-11.0-amd64-install.img of=/dev/<usb_device> bs=2m
Once it finishes, you can plug it in on your USB socket and boot the computer. Make sure you select the device as the first bootable device in your BIOS.
Preparing the Installation
Exit “sysinst”
When you boot from the usb flash drive, you will get at some point the sysinst installation program. Press CTRL+C to exit from sysinst and get a prompt.
You will see the following message followed by the root prompt.
Sysinst terminated.
To return to the installer, quit this shell by typing 'exit' of ^D
#
Setup the keyboard layout
If you have a non English keyboard, you might want to set the keyboard layout with the following command. For instance, to enable the Spanish keyboard layout, type the following command:
# wsconsctl -w encoding=es
encoding -> es
Note: The NetBSD console only admit ASCII characters, so letters like “Ñ” won’t be shown, but the layout will be correct.
Setup networking
To make the installation process more comfortable, I decided to enable networking and the SSH server in the target computer, so I can also take screenshots and document it better.
I will be using a LAN, so connect your ethernet cable to the router and enable DHCP. The following command will retrieve the IP and default gateway from your router DHCP server.
# /sbin/dhcpcd -d -n re0
“re0” is the network interface driver. NetBSD uses the driver name instead of the GNU/Linux “eth” nomenclature. In my case, “re0” stands for Realtek ethernet driver.
You can check the name of the interface and its status using the ifconfig command
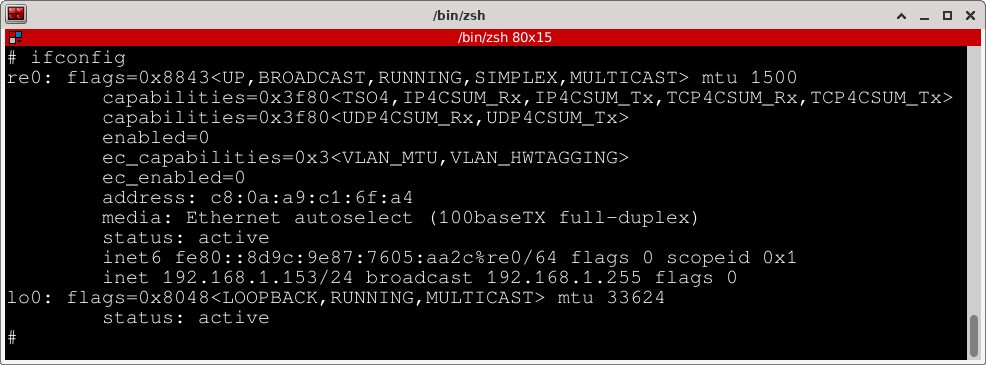
Enable SSH server
Add a local user. It’s a good practice to create a local user for non-privileged operations, as well as to remotely login without using “root”. We will create the user “malatesta” and make him a member of the “wheel” group, so he can do a “su -” operation and assign a password.
Note: This user only lives in the installation usb drive.
# useradd -m malatesta
# usermod -G wheel malatesta
# passwd malatesta
Next we need to start the SSH server, so the live system will allow remote connections and we can resume the installation from another computer.
# service sshd onestart
Setting up disks and partitions
Now we are ready to start configuring important, non-volatile resources, starting with the target disk that will hold the operating system.
About Disks, partitions and BSD disklabels
Before we move on, I think is pertinent to talk a bit about how NetBSD deals with disks and partitions.
Disks
In NetBSD, and similar to the network interfaces, physical disks are represented by the driver interface, followed by an integer. The logical and raw devices are under the “/dev” directory. The following are some of the drivers:
wd: IDE drives (atabus). Regular hard drives
sd: SCSI drives (scsibus). This includes USB pendrives.
cd: CDROM drives
To list the current disks in your computer, use systcl hw.disknames command:
# sysctl hw.disknames
hw.disknames = wd0 cd0 sd0 dk0 dk1
In this example, wd0 is the IDE drive (where we’ll be installing NetBSD), cd0 is the CDROM, sd0 the USB pendrive and finally dk0 and dk1 are “wedges” (GPT partitions) belonging to sd0.
Now we know -from the naming conventions- that wd0 is our internal hard drive, and that is where we will install NetBSD.
Partitions
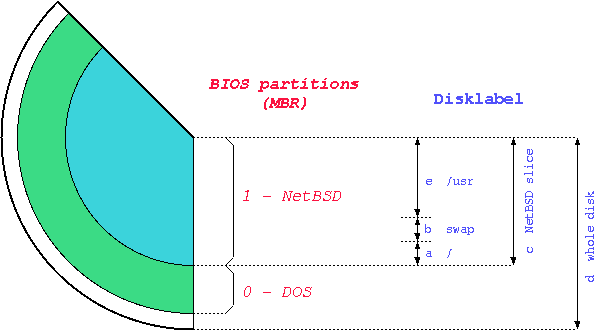
As previously mentioned, we will use a non UEFI, BIOS computer, so we’ll be installing NetBSD using the MBR (Master Boot Record) partitioning schema.
- Master Boot Record (MBR). Traditional BIOS had a way of identifying the different partitions on a disk by writing their attributes in the first sector of the physical disk. The MBR partitioning schema limits the number of physical partitions (also called “slices” in NetBSD jargon) to 4, and deals with disks of 2 terabytes (TB) or less. It is managed with the fdisk program.
- Disklabel: The disklabel is a NetBSD feature that allows the creation of multiple partitions within an MBR slice. The disklabel information is stored in the MBR, and is managed with the disklabel program.
Partitioning the hard drive to install NetBSD
We already know what will be our target hard drive (wd0 in this particular instance). In order to install and make it bootable, we need to partition it. We will use the entire hard drive for NetBSD, although you could install more than one operating system in the same physical device.
Showing the current partitions
To list the details of the partition table, run the command fdisk along the disk drive (e.g. fdisk wd0)
# fdisk wd0
# fdisk wd0
Disk: /dev/rwd0
NetBSD disklabel disk geometry:
cylinders: 1938021, heads: 16, sectors/track: 63 (1008 sectors/cylinder)
total sectors: 1953525168, bytes/sector: 512

BIOS disk geometry:
cylinders: 1023, heads: 255, sectors/track: 63 (16065 sectors/cylinder)
total sectors: 1953525168

Partitions aligned to 16065 sector boundaries, offset 63

Partition table:
0: NetBSD (sysid 169)
    bootmenu: NetBSD
    start 2048, size 1953523120 (953869 MB, Cyls 0/32/33-121601/80/63), Active
1: <UNUSED>
2: <UNUSED>
3: <UNUSED>
Bootselector disabled.
First active partition: 0
Drive serial number: 0 (0x00000000)
The previous fdisk command also provided key information about the size of the hard drive. From the disklabel geometry, we get total sectors: 1953525168, bytes/sector: 512 which produces 1000204886016 bytes , approximately 931 GB
![# fdisk -u wd0
Disk: /dev/rwd0
NetBSD disklabel disk geometry:
cylinders: 1938021, heads: 16, sectors/track: 63 (1008 sectors/cylinder)
total sectors: 1953525168, bytes/sector: 512
BIOS disk geometry:
cylinders: 1023, heads: 255, sectors/track: 63 (16065 sectors/cylinder)
total sectors: 1953525168
Partitions aligned to 16065 sector boundaries, offset 63
Do you want to change our idea of what BIOS thinks? [n]](https://meanmicio.org/wp-content/uploads/2026/09/image-3.png)
Initialize the partition table
If the disk we are using has a previous partition table and/or disklabel, it is a good idea to initialize it, so we don’t get spurious data.
We run again fdisk on the target drive in interactive mode (fdisk -u wd0). This time, we select the partition to initialize and enter the sysid 0 that will set it to UNUSED
Which partition do you want to change?: [none] 0
The data for partition 0 is:
NetBSD (sysid 169)
    bootmenu: NetBSD
    start 2048, size 1953523120 (953869 MB, Cyls 0/32/33-121601/80/63), Active
sysid: [0..255 default: 169] 0

Partition table:
0: <UNUSED>
1: <UNUSED>
2: <UNUSED>
3: <UNUSED>
Bootselector disabled.
No active partition.
Drive serial number: 0 (0x00000000)
Which partition do you want to change?: [none]

Installed bootfile doesn't support required options.
Update the bootcode from /usr/mdec/mbr? [n] y
Removing the current disklabel information
We have removed the partition 0, but the disklabel is still present. We will remove it with the following command:
# disklabel -D wd0
Partition layout
We will be using a single MBR slice that will hold the root filesystem and a large CGD partition to host the encrypted filesystems and swap.
MBR (use fdisk command)
0 .- 950 GB (sysid 169 – NetBSD). Bootable (“active”)
1-3: <UNUSED>
Disklabel partitions (use disklabel command)
a: 50 GB (4.2BSD to mount the unencrypted root filesystem)
b: swap (we’ll use swap in the CGD volume)
c: entire disk
e: 900 GB (CGD volume to hold encrypted /home, /usr, /var and swap partitions)
Disklabels have also conventions. The letter “a” holds the root filesystem. “b” is traditionally for swap, “c” is the entire disk (is managed by the kernel and can not be modified) and “e” is the MBR
Creating the MBR NetBSD partition with fdisk
We run fdisk command interactively to set the type (sysid) of the partition to NetBSD, assign a size of 950 GB and set it to bootable (‘active’).
# fdisk -u wd0
# fdisk -u wd0
Disk: /dev/rwd0
NetBSD disklabel disk geometry:
cylinders: 1938021, heads: 16, sectors/track: 63 (1008 sectors/cylinder)
total sectors: 1953525168, bytes/sector: 512

BIOS disk geometry:
cylinders: 1023, heads: 255, sectors/track: 63 (16065 sectors/cylinder)
total sectors: 1953525168

Partitions aligned to 2048 sector boundaries, offset 2048

Do you want to change our idea of what BIOS thinks? [n]

Partition table:
0: <UNUSED>
1: <UNUSED>
2: <UNUSED>
3: <UNUSED>
Bootselector disabled.
No active partition.
Drive serial number: 0 (0x00000000)
Which partition do you want to change?: [none] 0
The data for partition 0 is:
<UNUSED>
sysid: [0..255 default: 169]
start: [0..121601cyl default: 2048, 0cyl, 1MB]
size: [0..121601cyl default: 1953523120, 121601cyl, 953869MB]
bootmenu: [] (space to clear)NetBSD

Partition table:
0: NetBSD (sysid 169)
    bootmenu: NetBSD
    start 2048, size 1953523120 (953869 MB, Cyls 0-121601/80/63)
1: <UNUSED>
2: <UNUSED>
3: <UNUSED>
Bootselector disabled.
No active partition.
Drive serial number: 0 (0x00000000)
Which partition do you want to change?: [none]

Installed bootfile doesn't support required options.
Update the bootcode from /usr/mdec/mbr_bootsel? [n] y

We haven't written the MBR back to disk yet.  This is your last chance.
Partition table:
0: NetBSD (sysid 169)
    bootmenu: NetBSD
    start 2048, size 1953523120 (953869 MB, Cyls 0-121601/80/63)
1: <UNUSED>
2: <UNUSED>
3: <UNUSED>
Bootselector enabled, timeout 10 seconds.
No active partition.
Drive serial number: 0 (0x00000000)
Should we write new partition table? [n] y
#
Set the ‘active’ (bootable) partition
We set the NetBSD partition (0) to be active (bootable)
# fdisk -a0 wd0
# fdisk -a0 wd0
Disk: /dev/rwd0
NetBSD disklabel disk geometry:
cylinders: 1938021, heads: 16, sectors/track: 63 (1008 sectors/cylinder)
total sectors: 1953525168, bytes/sector: 512

BIOS disk geometry:
cylinders: 1023, heads: 255, sectors/track: 63 (16065 sectors/cylinder)
total sectors: 1953525168

Partitions aligned to 16065 sector boundaries, offset 63

Partition 0:
NetBSD (sysid 169)
    bootmenu: NetBSD
    start 2048, size 1953523120 (953869 MB, Cyls 0/32/33-121601/80/63)
Do you want to change the active partition? [n] y
Choosing 4 will make no partition active.
active partition: [0..4 default: 0]
Are you happy with this choice? [n] y

We haven't written the MBR back to disk yet.  This is your last chance.
Should we write new partition table? [n] y
Bootstrapping
To make the system bootable, we need to install the bootstraps with installboot.
# installboot -v /dev/wd0a /usr/mdec/bootxx_ffsv1 /boot
# installboot -v /dev/wd0a /usr/mdec/bootxx_ffsv1 /boot
File system:         /dev/rwd0a
File system type:    ffs (blocksize 16384, needswap 0)
Primary bootstrap:   /usr/mdec/bootxx_ffsv1
Secondary bootstrap: /boot
Boot options:        timeout 5, flags 0, speed 9600, ioaddr 0, console pc
Assigning the main disklabel partitions
We will create the disklabels in two steps. The first step will create the disklabel for the root partition (which will hold the root (‘/’) filesystem and the partition reserved to the CGD volume.
Once these two partitions are created, we will run again the disklabel command, this time using the cgd0 pseudo device.
We use disklabel interactively to create 2 partitions (a and e). Remember that c and d are reserved. ‘c’ partition represents the NetBSD partition on the MBR and ‘d’ the whole disk.
Partition ‘a’ (wd0a) will hold the root filesystem and partition ‘e’ (wd0e) the CGD volume.
# disklabel -iI wd0
# disklabel -iI wd0
Enter '?' for help
partition>a
Filesystem type [unused]: 4.2BSD
Start offset ('x' to start after partition 'x') [0c, 0s, 0M]: 2048s
Partition size ('$' for all remaining) [0c, 0s, 0M]: 51200M
 a: 104857600      2048     4.2BSD      0     0     0  # (Cyl.      2*- 104027*)
partition>e
Filesystem type [4.2BSD]: cgd
Start offset ('x' to start after partition 'x') [2.0317461490631103515625c, 2048s, 1M]: a
Partition size ('$' for all remaining) [1938018.875c, 1953523120s, 953868.6875M]: $
 e: 1848665520 104859648        cgd                     # (Cyl. 104027*- 1938020)
partition>W
Label disk [n]?y
Label written
partition>Q
A section of the output from the command disklabel wd0 shows the partitions on the NetBSD MBR slice. I have
         size     offset     fstype [fsize bsize cpg/sgs]
 a: 104857600       2048     4.2BSD      0     0     0  # (Cyl.      2*- 104027*)
 c: 1953523120      2048     unused      0     0        # (Cyl.      2*- 1938020)
 d: 1953525168         0     unused      0     0        # (Cyl.      0 - 1938020)
 e: 1848665520 104859648        cgd                     # (Cyl. 104027*- 1938020)
Create the CGD (Cryptographic Disk Driver) volume
Now that we have the CGD partition created on wd0e , we need to initialize the CGD volume, that itself will hold the operating system filesystems encrypted (except root).
Generate the parameters file for the CGD volume, using the adiantum cipher and disklabe as the verification method.
# cgdconfig -g -V disklabel -o /etc/cgd/wd0e adiantum
pkcs5_pbkdf2: calibrating iterations................. done
The following /etc/cgd/wd0e is generated:
algorithm adiantum;
iv-method encblkno1;
keylength 256;
verify_method disklabel;
keygen pkcs5_pbkdf2/sha1 {
        iterations 292728;
        salt AAAAgPBuE6TEwv2TqPo4rowkEt8=;
};
As mentioned in the NetBSD guide related chapter, this file is critical, so make sure you back it up.
At this point, we are ready to create the actual CGD volume. The following command will ask us to enter the password that will later unlock the encrypted device.
# cgdconfig -V re-enter cgd0 /dev/wd0e
/dev/wd0e's passphrase:
re-enter device's passphrase:
#
The CGD partitions
The newly created CGD volume cgd0 behaves the same as another disk. We can now move on to creating the CGD partitions.
# disklabel -iI cgd0
We repeat the steps to create the partitions in CGD similarly as we did in the MBR slice. After we create and write the contents to disklabel, we end up with this list:
cgd0
6 partitions:
#        size    offset     fstype [fsize bsize cpg/sgs]
 a: 1638400000         0     4.2BSD      0     0     0  # (Cyl.      0 - 799999)
 b:  20480000 1638400000       swap                     # (Cyl. 800000 - 809999)
 d: 1848665520         0     unused      0     0        # (Cyl.      0 - 902668*)
 e: 102400000 1658880000     4.2BSD      0     0     0  # (Cyl. 810000 - 859999)
 f:  61440000 1761280000     4.2BSD      0     0     0  # (Cyl. 860000 - 889999)
Creating the filesystems
We now proceed to create the filesystems in their respective partitions. We will be using the FFS filesystem with the command newfs for each target partition.
For instance, the following command will create the root (“/”) filesystem in the first partition (“a”) of the unencrypted device wd0
# newfs /dev/wd0a
If everything went well, you should see something like this:
/dev/rwd0a: 51200.0MB (104857600 sectors) block size 16384, fragment size 2048
	using 278 cylinder groups of 184.19MB, 11788 blks, 23296 inodes.
super-block backups (for fsck_ffs -b #) at:
32, 377248, 754464, 1131680, 1508896, 1886112, 2263328, 2640544, 3017760, 3394976, 3772192, 4149408,
.......................................................................................................
#
To create the filesystems residing in the cdg0 drive we would do the same, looking at the disklabel partition table above. For example, to create the large /home filesystem at partition “a” of the encrypted volume, execute the following command:
# newfs /dev/cgd0a
Partition “e” of cgd0 will hold the “/var” filesystem.
# newfs /dev/cgd0e
Repeat the commands for the remaining partitions.
Note: The swap partition (cgd0b) is a special type. Do not create a filesystem there.
Preparing target mount points
Now that the partitions and filesystems have been created in the target drives, we need to populate them with the base system, packages and devices.
Mount the target root filesystem under “/mnt/target”
# mkdir /mnt/target
# mount /dev/wd0a /mnt/target
Mount the remaining target filesystems in temporary directory
# mkdir /mnt/target/home
# mkdir /mnt/target/var
# mkdir /mnt/target/usr
# mount /dev/cgd0a /mnt/target/home
# mount /dev/cgd0e /mnt/target/var
# mount /dev/cgd0f /mnt/target/usr
Double check that your mount points and allocated space
# df -h
# df -h
Filesystem     Size   Used  Avail %Cap Mounted on
/dev/dk1       2.2G   1.6G   584M  74% /
tmpfs          3.7G    12K   3.7G   1% /tmp
/dev/wd0a       49G   8.0K    47G   1% /mnt/target
/dev/cgd0a     775G   4.0K   736G   1% /mnt/target/home
/dev/cgd0e      48G   2.0K    46G   1% /mnt/target/var
/dev/cgd0f      29G   2.0K    27G   1% /mnt/target/usr
Installing the binary sets
So far everything has gone smoothly. Now is time to extract the software sets that you wish.
The NetBSD installation guide says that we need to include at least “base“, “etc” and a kernel as a bare minimum. Once we boot the system, we can later install additional package sets.
Make sure you are in the newly created root filesystem:
# cd /mnt/target
Installing the kernel:
# tar -xzpvf /amd64/binary/sets/kern-GENERIC.tar.xz
x ./netbsd
Installing ‘base’ and ‘etc’ binary sets:
# tar -xzpf /amd64/binary/sets/base.tar.xz
# tar -xzpf /amd64/binary/sets/etc.tar.xz
Do the same for other packages you may want (“games”, “text”, “xserver”…)
Copying and adapting important files (cgd, fstab… )
Create the main CGD configuration file. This is important because CGD must be enabled before the filesystems are mounted.
# echo "cgd0 /dev/wd0e" > /mnt/target/etc/cgd/cgd.conf
Copy the current CGD parameter / cipher file:
# cp /etc/cgd/wd0e /mnt/target/etc/cgd/
Enable CGD at boot time:
# echo "cgd=YES" >> /mnt/target/etc/rc.conf
Create the target fstab file with the new filesystem entries
Making the devices in the target drive
As the MAKEDEV script says, “all” makes all known devices, including local devices
# cd /mnt/target/dev
# sh MAKEDEV all
Mounting and preparing kernel/proc/tmpfs
# mkdir kern proc
# mount_kernfs  kernfs   /mnt/target/kern
# mount_procfs procfs /mnt/target/proc/
# mount_tmpfs tmpfs /mnt/target/var/shm
# mount_ptyfs  ptyfs /mnt/target/dev/pts
Chroot to the new drive
Getting closer… now we need to chroot to the new environment, so we can update the root password, update the fstab file.
# chroot /mnt/target su -
Create the fstab file with the folllowing entries
# vi /etc/fstab
# The root filesystem (unencrypted)
/dev/wd0a   /     ffs     rw    1 1
# Swap, home, var and usr live in the encrypted CGD volume
/dev/cgd0b  none  swap    sw            0 0
/dev/cgd0a  /home ffs     rw            1 2
/dev/cgd0e  /var  ffs     rw            1 2
/dev/cgd0f  /usr  ffs     rw            1 2
# kernel, proc, pty and tmp filesystems
kernfs                  /kern   kernfs  rw
ptyfs                   /dev/pts        ptyfs   rw
procfs                  /proc   procfs  rw
/dev/cd0a               /cdrom  cd9660  ro,noauto
tmpfs                   /var/shm        tmpfs   rw,-m1777,-sram%25
Double check that the devices / partitions match your installation!
Add the new root password
# passwd
Include additional / optional entries to /etc/rc.conf
You can include or customize additional services in your rc.conf. For example, the hostname, mail server or DHCP client. Some common entries are:
hostname=tolstoy.gnuhealth.org (change it to your hostname)
critical_filesystems_local="/var /usr"
wscons=YES  # The NetBSD console subsystem
dhcpcd=YES  # Activate DHCP
postfix=NO  #Disable mail server
Rebooting the system to the newly installed NetBSD
If everything went well, then you should be happily booting into your new hard drive. Remember that since we have configured and enabled CGD, you need to enter the passphrase early on to continue the boot process, mounting of the filesystems and activation of services 🙂
From this point, you can explore different services, configure the package system (pkgin), set up the graphical interface and install cool games. The Sysinst program allows you to do post-installation tasks. This is just starting!
![fastfetch program running in NetBSD .
OS: NetBSD 11.0 amd64
Host: HP Pavilion dv6 Notebook PC (048E100000242B10000020000)
Kernel: NetBSD 11.0
Uptime: 1 hour, 2 mins
Packages: 7 (pkgsrc)
Shell: sh
Display (LVDS-1): 1366x768, 60 Hz [Built-in]
Terminal: /dev/pts/1
CPU: Intel(R) Core(TM) i7 Q 720 (8) @ 1.47 GHz
Memory: 164.63 MiB / 3.79 GiB (4%)
Swap: 0 B / 9.77 GiB (0%)
Disk (/): 171.06 MiB / 49.22 GiB (0%) - ffs
Disk (/home): 28.00 KiB / 775.12 GiB (0%) - ffs
Disk (/usr): 1.02 GiB / 28.84 GiB (4%) - ffs
Disk (/var): 62.75 MiB / 48.07 GiB (0%) - ffs
Local IP (re0): 192.168.1.153/24
Battery: 100% [AC Connected]
Locale: C](https://meanmicio.org/wp-content/uploads/2026/09/image-4.png)
An operating system made by humans, for humans
Last but not least… I wrote about generative AI / LLM becoming the new pandemic and why we need to find ethical Free/Libre Software alternatives for our computing and for our society. NetBSD is one of the projects that took a stance against the use of genAI and that by itself deserves our support, respect and adoption.
Resources
Writing this post has been a lot of fun and a fantastic learning experience to dive into the NetBSD internals. The following resources have been very helpful and inspiring. They are mainly focused in UEFI, but a lot of information is also valid for MBR systems, and you will probably have a UEFI system anyways 🙂
- The NetBSD guide. A must read for any one coming to NetBSD. Very good information on the Cryptographic Device Driver -CGD- . https://netbsd.org/docs/guide/en/ .
- The manual pages. NetBSD “man” mages are a fantastic learning resource.
- UnitedBSD: “Manual NetBSD installation on GPT/UEFI“. Excellent document. Found specially interesting the kernel filesystem! https://www.unitedbsd.com/d/771-netbsd-desktop-part-1-manual-netbsd-installation-on-gptuefi
- Daniel Wayne Armstrong: “NetBSD 11.0 Installation with Disk Encryption”. A wonderful guide to GCD and manual installation for UEFI systems, with links to other great NetBSD resources. https://www.dwarmstrong.org/netbsd-encrypt-install/#fstab
Thank you all for sharing your time, knowledge and talent. ♥
PS: I am sure there are errors and better ways to implement any of the processes in this post. Please ping me and I’ll update it! You can find me in Mastodon (https://todon.eu/@meanmicio).
Happy hacking!
PS: Thank you to all for the positive messages and suggestions coming from the Fediverse and the Internet in general! I’m updating the post accordingly 😊


You must be logged in to post a comment.